Prior to building and running our client project, make sure that our Web Service application project, WebAppCourse, has been built and deployed successfully.
Perform the following operations to build and run our client project, WebClient Course _ Insert:
- Click on the Clean and Build Main Project button to build our project.
- Then click on the Run Project button (green arrow) on the top to run our project.
When the project runs and the course page is opened, enter a valid faculty name, such as Ying Bai, into the Faculty Name box, and then click on the Select button to query all courses (course _ id) taught by this faculty member. All four courses (course _ id) should be retrieved from our database and displayed in the CourseList box, as shown in Figure 9.106.
Let’s test inserting a new course record into the Course Table in our sample database. Keep the selected faculty member, Ying Bai, with no change and enter the following six pieces of informa-tion as a new course record into the six related TextFields in this course page:
| • | Course ID: | CSE-565 |
| • | Course Name: | Machine Learning |
| • | Schedule: | T-H: 9:30–10:45 AM |
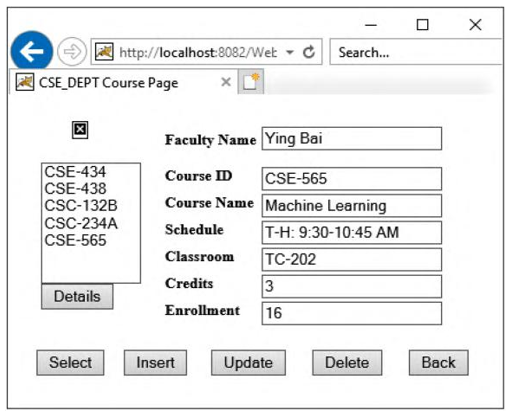
FIGURE 9.107 The confirmation result of the new inserted course record.
| • | Classroom: | TC-202 |
| • | Credit: | 3 |
| • | Enrollment: | 16 |
Click on the Insert button to try to insert this new course record into the Course Table in our sample database, CSE _ DEPT. If this insertion action is successful, the client page Course.jsp is refreshed to clean all contents to null in each TextField.
To check the data insertion, just click on the Select button to retrieve all courses (course _ id) taught by the selected faculty member, Ying Bai. One can see that the new inserted course, CSE-565, is retrieved and displayed in the CourseList box, as shown in Figure 9.107.
Select this new inserted course from this CourseList box by clicking on it, and then click on the Details button to get details for this course record. The details about this new inserted course are displayed in six
TextFields, as shown in Figure 9.107. Our data insertion with our Web client project is successful! Click on the Back and the Exit buttons to close our project.
Another way to confirm the data insertion is to open the Course Table via the Services win-dow in the NetBeans IDE. After opening the Services window, expand the Databases icon and connect to our sample database by right-clicking on our database URL. Select the Connect item and enter the password, oracle _ 18c, to connect to our sample database. Then expand our database, CSE _ DEPT, and Tables folders, right-click on the COURSE Table and select the View Data item to open this Table. One can see that the new course is really inserted into the Course Table; it is located on the bottom line that has been highlighted, as shown in Figure 9.108.
Next let’s build and develop the code for our client project to access our Web Service to update a selected course in our Course Table.